MultiMap-documentation
ImageJExtension
ImageJ is a public domain, Java-based image processing program developed at the National Institutes of Health. It was designed with an open architecture that provides extensibility via Java plugins and recordable macros. Analysis and processing plugins can be developed using ImageJ’s built-in editor and a Java compiler. User-written plugins make it possible to solve many image processing and analysis problems.
ImageJExtension is a MultiMap extension that connects MultiMap to an ImageJ installation, allowing some image processing tasks directly from MultiMap.
Install
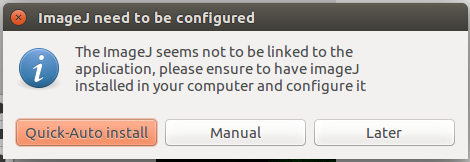
When the extension is activated it automatically check if it is linked to an ImageJ installation, if not the user will be warned and three options to link ImageJ will be given:
- Quick Auto-Install (recommended if you don’t know what we are talking about), this options automatically download ImageJ and some needed plugins.
- Manual the user can manually select the path to the ImageJ installation.
- Later the user can dismiss the alert and from the ImageJ menu, select the configure ImageJ sub-menu and then install ImageJ, the user will be asked to select a destination folder where ImageJ will be installed.
If options 2 or 3 are used it is suggested to install the needed plugins with the appropriate action in the configure ImageJ menu.
Using the extension
Attention Some ImageJ task have problems with files names or folder names with spaces. In order to avoid errors using ImageJExtension is better to use folder and filenames without spaces.
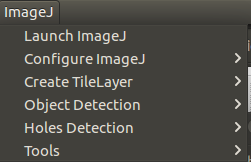
Launch ImageJ
ImageJ user interface can be launched through “Launch ImageJ” menu entry. This tool can be useful for performing some preprocessing operations to prepare images for MultiMap usage.
Configure
ImageJ JVM memory settings (heap and stack) can be configured. By default, Java heap memory is set to 70% of total system memory, and Java stack memory is set to 515MB.
Create a Tile Layer
It is possible to create a TileLayer that can then added to a map using ImageJ plugin MapTools, the plugin is installed automatically and can be used directly from MultiMap.
Just select ImageJ > Create TileLayer > from image and select an image (jpg, png, tiff or an other format supported by ImageJ).
MultiMap will then read the metadata of the image (it can take some seconds for very big images or complicated formats) and display a modal where you need to enter the following parameter:
Map name (default: "map") this is the layer name.
Pixel tiles dimension (default: 256).
Maximum zoom (default: 5).
Use all slice (default: no): if source image has more than one slice and this option is checked, a multilevel tilelayer will be created.
Merge all slices (default: no): if source image has more than one slice and this option is checked, a max intensity projection (ImageJ ZProjection) of all slices will be performed and the output will be used as input for layer creation.
Slice used (default: 1): if source image has more than one slice, this option allows to choose what slice will be used as input for map creation.
Output folder: the path where output map will be saved.
From folder
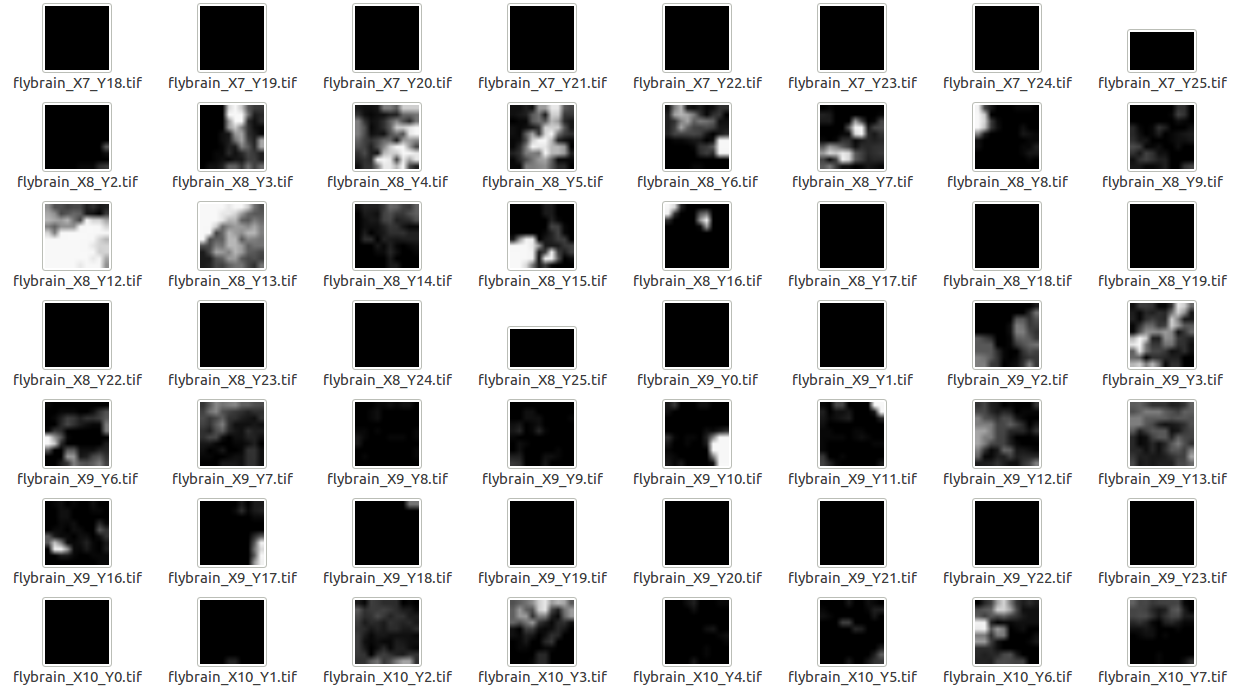
This option is intended to create a layer from a big image which is splitted in a small collection of images (a mosaic). Each image name must contain its X and Y coordinates in the original image. For example, partial_image_X0_Y0.tiff will be the image in the left upper corner.
When using this option, a dialog will be opened to choose the left upper corner image, then MultiMap needs to combine all images and you will be asked to set the parameter as above plus three image combination parameters:
Initial slice (default: 1).
Last slice (default: 1).
Scale (default: 1.000): the combined image scale, this parameter goes from 0 to 1 (original size) Use this parameter to be able to fit the scaled image in memory.
When this task finishes the layer can be added to a map in the workspace. Remember that for now MapTools plugin need to load all the image in memory so use the Scale parameter to be sure to load just a scaled version of very large maps.
Object Detection
Object detection is a tool for detecting objects in an image. For this purpose, obj_detection ImageJ plugin is used, which calculates object centroids using image segmentation techniques. This extension allows to detect objects from a single image, from a folder with many images, or from a list of images, In all cases, following parameters can be configured:
Minimum radius (default: 1): MaxLoGs Min R parameter.
Maximum radius (default: 5): MaxLoGs Max R parameter.
By (default: 1): MaxLoGs step parameter.
Threshold method (default: "Moments").
Minimum (default: 1).
Maximum (default: -1).
Fraction (default: 0.500).
Tolerance (default: 0).
Output folder: the path where detected objects data will be saved, usually the folder with the map of the image being processed is used.
When this task finishes, the layer with detected objects data (called csvTiles) can be added to a map in the workspace.
Holes Detection
Holes detection is a tool for detecting holes in an image. For this purpose, obj_detection ImageJ plugin is used, which calculates holes using median filtering and thresholding. This extension allows to detect holes from a single image, from a folder with many images, or from a list of images, In all cases, following parameters can be configured:
Radius of median filter (default: 10).
Threshold (default: 250).
Output folder: the path where detected holes data will be saved, usually the folder with the map of the image being processed is used.
The result is a mosaic of holes mask that can be converted to a tileLayer.
An example of holes detection is shown here:

Mosaic
This tool is located inside “Tools” submenu, it allows to divide a big image into small parts (tiles). The following parameters must be configured:
Tile size (default: 10): Defines the width and height of the output tiles.
Original image height (default: 10).
Original image width (default: 10).
X0 (default: 0): The start number for generated tiles in X axis.
Y0 (default: 0): The start number for generated tiles in Y axis.
Output folder: the path where splitted parts (tiles) will be saved.
Each tile name will be the original image name plus its X and Y position, e.g. original_image_X0_Y0.tif usually will be the upper left corner tile.
The result of creating a mosaic with an image is shown in the following image: